Model 驗證及回呼
資料驗證(Validation)
開發網站應用程式,資料的正確性是很重要的。大家應該都不會想被有意或無意的在資料庫裡塞了奇怪的資料,所以通常都會加上資料驗證的機制,確保寫入的資料是符合規定的。
驗證該在哪裡做?
那,這個資料驗證機制該寫在哪裡比較好呢?常見的選項有:
- 前端驗證:在 HTML 頁面使用 JavaScript 在使用者填寫資料的時候檢查。
- 後端驗證:資料上傳到伺服器後,在寫入資料庫之前由網站應用程式進行檢查。
- 資料庫驗證:直接由資料庫本身所提供的功能來做資料驗證。
雖然前端驗證簡單容易做,但如果如果使用者關掉 JavaScript 功能,或是直接檢視 HTML 原始碼,自己做一個一樣的表單,一樣可以送資料進來,所以即使在 HTML 頁面已經有驗證,在寫入資料庫前還是得再做一次檢查。
資料庫驗證雖然可行,但缺點不見得每種資料庫系統都有提供一樣的功能,一旦換了資料庫系統可能會沒辦法正常運作。但好處是如果這個資料庫還有跟其它程式語言開發的系統共用,資料庫驗證比較可以確保不管是哪個系統寫進來的資料都是正確的了。
資料驗證這件事在 Rails 的 MVC 三分天下的架構中,Controller 跟 Model 都可以做這件事,要在 View 裡寫 JavaScript 做檢查也可以,但這件事如果交給 Controller 或 View 來做,一來會讓程式碼的邏輯變得更複雜,二來這個驗證不容易被重複使用,也不容易被測試,所以資料機制寫在 Model 裡是比較合理而且單純的。
在 Model 裡加上驗證
假設我們有一個叫做 Article 的 Model,希望每篇文章的文章標題(title)是必填資訊,可以這樣寫:
class Article < ApplicationRecord
  validates :title, presence: true
end
中間那行 validates 方法的意思是「title 這個欄位為必填欄位」,讓我們開 rails console 起來試一下:
$ bin/rails console
>> a1 = Article.new
=> #<Article id: nil, title: nil, content: nil, is_online: nil, created_at: nil, updated_at: nil, photo: nil, user_id: nil>
先用 new 方法建立一個 Article 物件,然後用 errors 方法看一下這個物件有沒有什麼狀況:
>> a1.errors.any?
=> false
這時候看起來沒什麼問題。接著試著呼叫 save 方法把這顆物件存入資料表:
>> a1.save
   (0.2ms)  begin transaction
   (0.1ms)  rollback transaction
=> false
發現 save 方法失敗了,並且回傳 false,來看看到底是哪邊有問題:
>> a1.errors.any?
=> true
原本沒問題的,在 save 之後變得有問題了。來看看錯誤訊息是什麼:
>> a1.errors.full_messages
=> ["Title can't be blank"]
除了 validates :title, presence: true 之外,還有另一種寫法:
class Article < ActiveRecord::Base
  validates_presence_of :title
end
效果也是一樣的。
除了 presence 之外,Rails 還有提供其它像是 uniqueness、length 或 numericality 等便利的驗證器,使用方法可直接參考 Rails Guide 的 Validations 章節。
不是每個方法都會被驗證…
雖然驗證功能很方便,但並不是每種方法都會觸發驗證,僅有以下這些方法會觸發驗證:
- create
- create!
- save
- save!
- update
- update!
其它方法不會經過驗證流程喔,例如像是 toggle! 或 increment! 等方法會跳過驗證流程,這點也需要特別留意。
有驚嘆號版本的,如果驗證未通過會產生錯誤訊息,沒有驚嘆號版本則僅會回傳該 Model 的一個空物件。
如果想要主動跳過驗證,也可在呼叫 save 的時候加上 validate: false 的參,像這樣:
user1 = User.new
user1.save(validate: false)
驗證沒過的時候…
當資料驗證沒過的時候,可以透過該物件本身的 errors 方法得知。一樣先做一顆新的 User 物件,其中 name 欄位為必填欄位:
$ bin/rails console
>> user1 = User.new
=> #<User id: nil, name: nil, age: nil, email: nil, created_at: nil, updated_at: nil>
試著呼叫 save 方法,要把這筆資料寫入資料表:
>> user1.save
   (0.3ms)  begin transaction
   (0.1ms)  rollback transaction
=> false
失敗了!這時候可以透過 errors 方法看一下到底是哪裡出錯:
>> user1.errors
=> #<ActiveModel::Errors:0x007ff6b94aa7d8 ...[略]..., @messages={:name=>["can't be blank"]}, @details={:name=>[{:error=>:blank}]}>
>> user1.errors.full_messages
=> ["Name can't be blank"]
喔,原來是 name 欄位沒填寫。
在 save 的時候才發生驗證錯誤嗎?
有些人也許認為要呼叫 save 或 create 方法,試圖把資料寫入資料表的時候才會發生驗證錯誤,其實不用寫入資料表也可以知道這筆資料是否有效。先用 new 方法建立一個 User 物件:
>> user1 = User.new
=> #<User id: nil, name: nil, age: nil, email: nil, created_at: nil, updated_at: nil>
這時候檢查一下是不是有錯誤訊息:
>> user1.errors.any?
=> false
很好!沒有任何錯誤訊息。這時候用 valid? 方法問一下這筆資料是否能通過驗證:
>> user1.valid?
=> false
啊,沒通過驗證!再回頭看一下是不是有錯誤訊息:
>> user1.errors.any?
=> true
>> user1.errors.full_messages
=> ["Name can't be blank"]
即使沒有執行 save 方法,也是會觸發驗證的。
自訂驗證器 Validator
現有的驗證器不夠用嗎?有幾種方式可以自訂驗證器:
1. 寫一個方法,掛到 validate 方法上:
class User < ActiveRecord::Base
  validate :name_validator

  private
  def name_validator
    unless name.starts_with? 'Ruby'
      errors[:name] << "必須是 Ruby 開頭喔!"
    end
  end
end
注意:這個方法是
validate,不是validates喔。
這種寫法滿簡單的,就是直接寫一個普通的方法(通常會放在 private 區塊),當條件不符規定的時候,就在 errors 這個 Hash 裡面塞錯誤訊息。用起來就跟一般的驗證器差不多:
$ bin/rails console
Running via Spring preloader in process 4628
Loading development environment (Rails 5.0.1)
>> user1 = User.new(name: "孫悟空")
=> #<User id: nil, name: "孫悟空", age: nil, email: nil, created_at: nil, updated_at: nil>
>> user1.save
   (0.1ms)  begin transaction
   (0.3ms)  rollback transaction
=> false
>> user1.errors.full_messages
=> ["Name 必須是 Ruby 開頭喔!"]
2. 遵循 Rails 的驗證器規則:
想寫出這樣的語法嗎?
class User < ActiveRecord::Base
  validates :name, presence: true, begin_with_ruby: true
end
這個驗證器可以跟其它內建的驗證器一起混著使用,使用起來會更簡潔。要寫這樣的驗證器需要符合 Rails Validator 的命名規則:
- 參數是
begin_with_ruby,類別名稱則是BeginWithRuby加上Validator,並繼承自ActiveModel::EachValidator類別。 - 必須實作
validate_each方法。
寫起來大概像這樣:
class BeginWithRubyValidator < ActiveModel::EachValidator
  def validate_each(record, attribute, value)
    unless value.starts_with? 'Ruby'
      record.errors[attribute] << "必須是 Ruby 開頭喔!"
    end
  end
end
在使用的時候,就是跟一般的 validates 差不多:
class User < ActiveRecord::Base
  validates :name, begin_with_ruby: true
end
在 rails console 試一下效果:
$ bin/rails console
Running via Spring preloader in process 4750
Loading development environment (Rails 5.0.1)
>> user1 = User.new(name: "孫悟空")
=> #<User id: nil, name: "孫悟空", age: nil, email: nil, created_at: nil, updated_at: nil>
>> user1.save
   (0.1ms)  begin transaction
   (0.0ms)  rollback transaction
=> false
>> user1.errors.full_messages
=> ["Name 必須是 Ruby 開頭喔!"]
回呼(Callback)
資料在存到資料表的過程中,其實不是直接把資料放進去這麼簡單。不同的行為(例如存檔、或刪除)可能會有不同的流程,舉個例子來說,當呼叫 save 方法的時候,整個資料寫入的過程大概會是以下的流程:
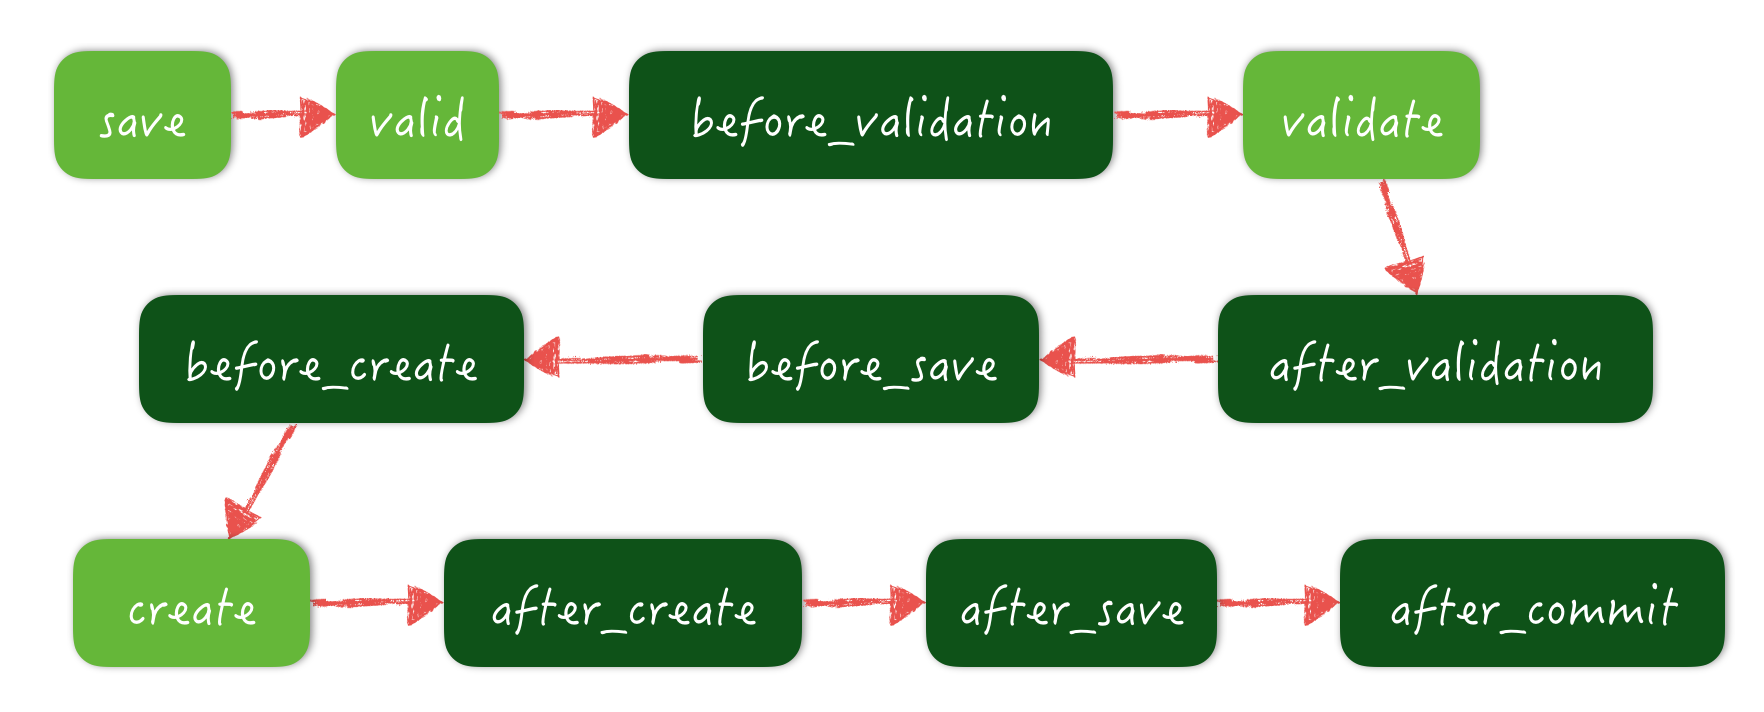
其中,顏色比較深的那幾個流程是有機會可以掛上一些方法,又稱之回呼(Callback),可以在這些流程執行的時候做一些事,像是這樣:
require 'digest'

class User < ActiveRecord::Base
  before_create :encrypt_email

  private
  def encrypt_email
    self.email = Digest::MD5.hexdigest(email)
  end
end
上面這段範例可以在建立使用者資料之前,先對 email 進行 MD5 加密。
注意:
before_save跟before_create的差別,在於before_save是每次存檔的時候都會經過,但before_create只有在「新增」的時候才會觸發。
除了這樣的寫法,如果內容單純的話,也是可以使用 Block 的方式來寫:
require 'digest'
class User < ActiveRecord::Base
  before_create do
    self.email = Digest::MD5.hexdigest(email)
  end
end
關於其它回呼的使用方式,可參考 Rails Guide 網站上關於 Callback 章節的說明
Comments