購物車 Part 3
在前面兩個章節,我們介紹如何使用 TDD 方式製作購物車,接下來這個章節將介紹如何使用它。
- 請先到 https://github.com/kaochenlong/shopping_mall 把程式碼 clone 一份到你的電腦。
- 使用 Git 切換到
using_cart分支。 - 執行
bundle install確認相關套件都有安裝成功。 - 執行
bin/rails db:migrate。 - 執行
bin/rails server指令,啟動伺服器。
順利的話,應該可以看到商品列表但沒有任何商品的畫面,請點擊「新增商品」按鈕,隨便加幾項商品,畫面大概長得像這樣:
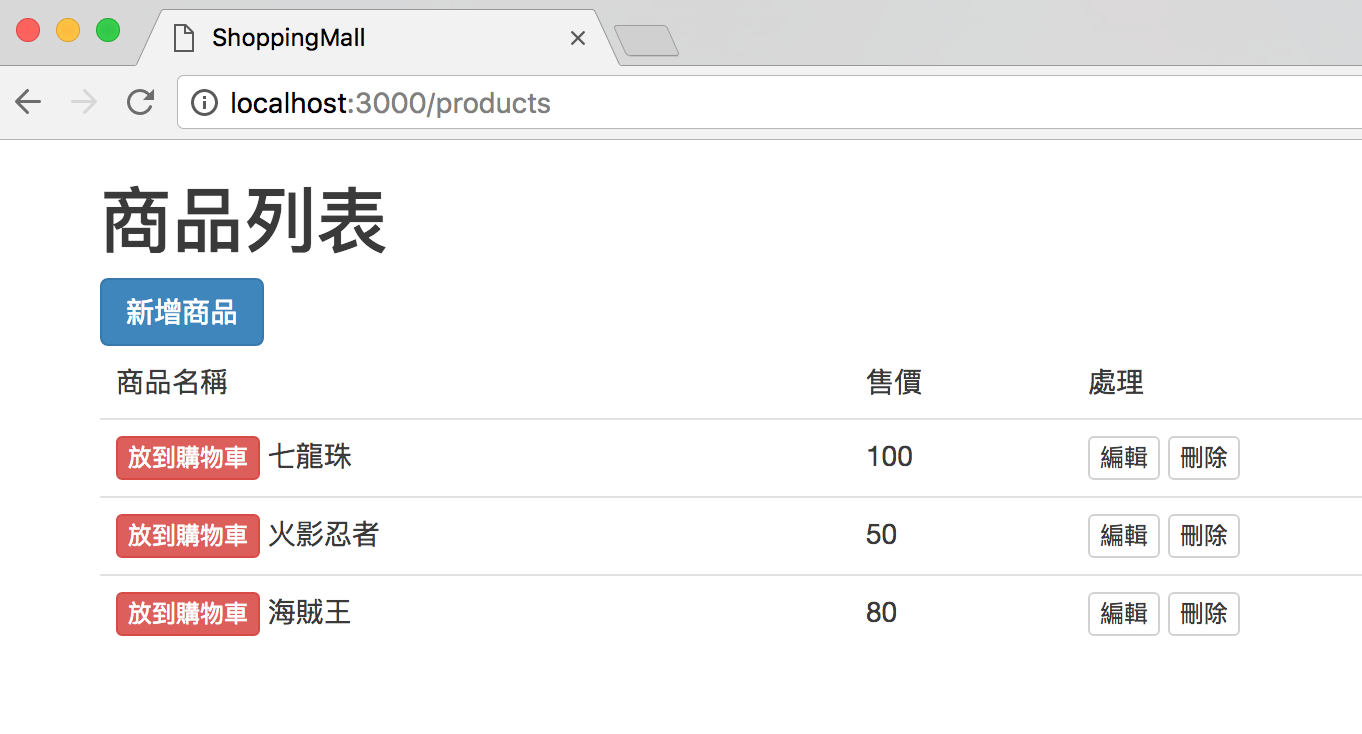
跟上個章節的進度比起來,其實只是多了商品的 CRUD 以及加了 Bootstrap 的美化而已,接下來就從這個地方繼續往下介紹。
放到購物車 Part 1
首先就從畫面上的那個「放入購物車」的按鈕開始。在第 13 章及第 14 章介紹 CRUD 時,當我們要開始新增功能的時候,通常第一步應該先從 Route 開始。
關於購物車,我希望它可以有「放到購物車」(add)、「檢視購物車」(show)以及「清空購物車」(destroy)的功能,但購物車應該只要一台,所以應該是使用單數的 resource 就行了,Route 寫起來大概會像這樣:
Rails.application.routes.draw do
  resources :products

  resource :cart, only:[:show, :destroy] do
    collection do
      post :add, path:'add/:id'
    end
  end
end
其中那個「放到購物車」這個按鈕的連結,我希望讓它的網址看起來像 /cart/add/2,所以特別在裡再加了 path 的寫法。這時候所有的 Route 應該會像這樣:
$ bin/rails routes
      Prefix Verb   URI Pattern                  Controller#Action
    products GET    /products(.:format)          products#index
             POST   /products(.:format)          products#create
 new_product GET    /products/new(.:format)      products#new
edit_product GET    /products/:id/edit(.:format) products#edit
     product GET    /products/:id(.:format)      products#show
             PATCH  /products/:id(.:format)      products#update
             PUT    /products/:id(.:format)      products#update
             DELETE /products/:id(.:format)      products#destroy
    add_cart POST   /cart/add/:id(.:format)      carts#add
        cart GET    /cart(.:format)              carts#show
             DELETE /cart(.:format)              carts#destroy
有了「放到購物車」的連結,就可以把原來在商品列表的這一行:
<%= link_to '放到購物車', "#", class: "btn btn-xs btn-danger" %>
改成這樣:
<%= link_to '放到購物車', add_cart_path(product), method: "post", class: "btn btn-xs btn-danger" %>
這時按下「放到購物車」按鈕,網址應該會變成 /cart/add/1 並且出現 CartsController 找不到的錯誤訊息。
放到購物車 Part 2
接下來,可手動或是使用產生器來建立 CartsController,並且在裡面加上 add 方法:
# 檔案:app/controllers/carts_controller.rb
class CartsController < ApplicationController
  def add
    # ...
  end
end
該怎麼把東西加到購物車裡? 其實在前面二章使用 TDD 方法設計購物車的時候應該都還有印象:
cart = Cart.new
cart.add_item 1
在 Controller 用起來也差不多,只是在建立購物車不是用 Cart.new,而是使用 Cart.from_hash 方法:
class CartsController < ApplicationController
  def add
    cart = Cart.from_hash(session[:cart9487])
    cart.add_item(params[:id])
    session[:cart9487] = cart.serialize

    redirect_to products_path, notice: "已加入購物車"
  end
end
說明:
- Session 用起來跟在使用 Hash 差不多,主要也是靠 Key 來存取。
- Session 的 key 可以挑選自己喜歡的,我這邊是選用了
:cart9487,但建議大家選個不太一樣的,避免發生重複的情況。 - 在轉址到下一個頁面之前,別忘了把購物車的內容存回 Session 裡。
這樣應該就可以把選購商品存到 Session 裡了。因為我們設計的購物車功能,我們可以很簡單的把商品加到購物車裡,並且重複的商品只會增加數量(Quantity)而不會增加購買項目(CartItem)。
放到購物車 Part 3
雖然在 CartsController 裡可以存取購物車的內容了,但其實其它 Controller 也可能需要取用購物車的內容,像這種「幾乎每個 Controller 都會用到的」功能有幾種做法,一種是直接放在上層的 Controller,讓所有繼承的下層 Controller 都可使用,另一種則是寫成模組(Concern 或是 View Helper),要用的時候再 include 進來。如果是放在上層 Controller 的做法,可直接在 ApplicationController 裡加上這段:
# 檔案 app/controllers/application_controller.rb
class ApplicationController < ActionController::Base
  protect_from_forgery with: :exception

  before_action :init_cart

  private
  def init_cart
    @cart = Cart.from_hash(session[:cart9487])
  end
end
把可以做出購物車的 Cart.from_hash 方法放到 ApplicationController,並掛在 before_action 上,讓每個 Controller 的每個 Action 都可以存取到 @cart 實體變數,剛剛 CartsController 就可改成這樣:
# 檔案 app/controllers/carts_controller.rb
class CartsController < ApplicationController
  def add
    @cart.add_item(params[:id])
    session[:cart9487] = @cart.serialize

    redirect_to products_path, notice: "已加入購物車"
  end
end
另一種使用模組方式的寫法,可寫一個 current_cart 的 View Helper:
# 檔案 app/helpers/carts_helper.rb
module CartsHelper
  def current_cart
    @cart ||= Cart.from_hash(session[:cart9487])
  end
end
如果這個 carts_helper.rb 不存在的話,請直接手動新增即可。寫成 View Helper 的好處是不僅在 View 可以直接使用,在 Controller 也可 include 進來使用:
# 檔案 app/controllers/application_controller.rb
class ApplicationController < ActionController::Base
  protect_from_forgery with: :exception

  include CartsHelper
end
這樣原來的 CartsController 可這樣改寫:
class CartsController < ApplicationController
  def add
    current_cart.add_item(params[:id])
    session[:cart9487] = current_cart.serialize

    redirect_to products_path, notice: "已加入購物車"
  end
end
寫起來程式碼又更簡潔一些了。不管是使用繼承方式或是 Helper 模組方式都可,以下我將採用模組(View Helper)方式。
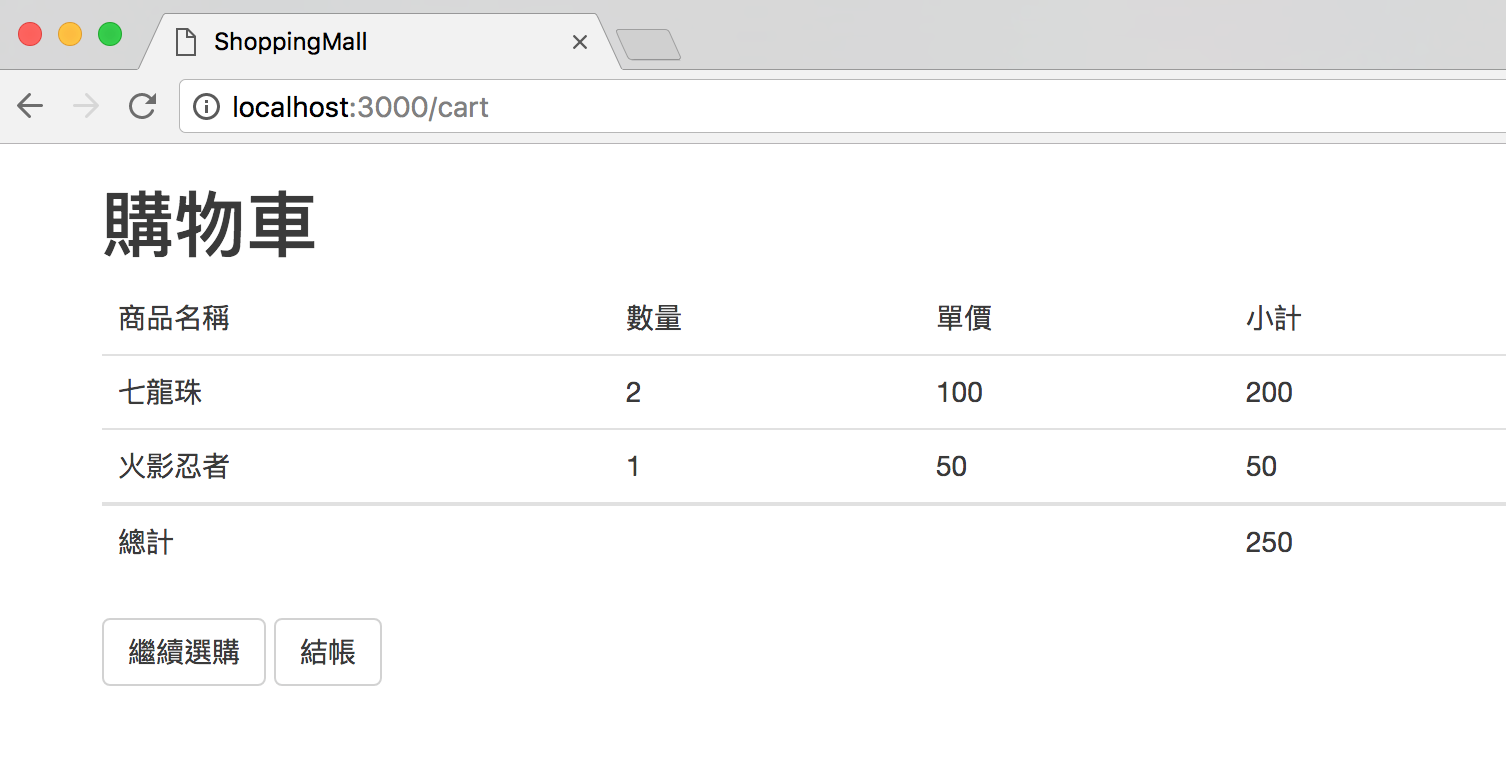
檢視購物車內容
前面我們已經成功地把商品放到購物車裡了,接著要來看看怎麼檢視裡面的內容。依照前面 Route 的寫法,檢視購物車的路徑應該是 cart_path,並且會連到 /cart 網址,所以我先在商品列表頁的「新增商品」旁邊加個連結:
<h1>商品列表</h1>

<%= link_to '新增商品', new_product_path, class: "btn btn-default btn-primary" %>
<%= link_to '購物車', cart_path, class: "btn btn-default btn-success" %>

<table class="table table-hover">
  ...[略]...
</table>
再來就是在 /app/views/carts/show.html.erb 把購物車的內容展開來(如果 show.html.erb 這個檔案或 app/views/carts 目錄不存在請直接手動新增即可):
<h1>購物車</h1>

<table class="table table-hover">
  <thead>
    <tr>
      <td>商品名稱</td>
      <td>數量</td>
      <td>單價</td>
      <td>小計</td>
    </tr>
  </thead>
  <tbody>
    <% current_cart.items.each do |item| %>
      <tr>
        <td><%= item.product.title %></td>
        <td><%= item.quantity %></td>
        <td><%= item.product.price %></td>
        <td><%= item.price %></td>
      </tr>
    <% end %>
  </tbody>
  <tfoot>
  <tr>
    <td colspan="3">總計</td>
    <td><%= current_cart.total_price %></td>
  </tfoot>
</table>

<%= link_to '繼續選購', products_path, class: "btn btn-default" %>
<%= link_to '結帳', '#', class: "btn btn-default" %>
因為前面有自己寫了一個叫做 current_cart 的 View Helper,可以直接取用購物車裡的資料,所以接下來就是使用 each 方法把內容物印出來。這裡你可以看到,我們都是使用之前在 TDD 階段設計好的方法,例如 item.product、item.price 以及 current_cart.total_price 等方法,盡量不要在 View 做太複雜的邏輯或計算。
這時候畫面看起來可能像這樣:
清空購物車
清空購物車應該是最容易的,照前面寫的 Route,清空(或說是刪除)購物車的路徑應該跟檢視購物車同樣都是 cart_path,只是使用的方法是 DELETE,我先在購物車的檢視頁面 app/views/carts/show.html.erb 加上連結:
<h1>購物車</h1>

<%= link_to '清空購物車', cart_path, method: :delete, class: "btn btn-default btn-danger" %>

<table class="table table-hover">
  <thead>
    <tr>
      ...[以下略]...
按下連結後它會去找 CartsController 的 destroy Action。又,因為我們的購物車是存放在 Session 裡,所以只要把它清除或是設定成 nil 就行了:
至於 destroy
class CartsController < ApplicationController
  # ...[略]...

  def destroy
    session[:cart9487] = nil
    redirect_to products_path, notice: "購物車已清空"
  end
end
這樣應該就可以把購物車的內容清掉了。
整理一下…
雖然我們在使用 Session 的時候是直接 session[:cart9487] 這樣用,基本上是不會有什麼問題,但如果你覺得那個 key 不好記,而且如果之後要改的話要全站每個用到的地方都要跟著改,實在有點不方便,也可以把這個 key 抽出來放在某個地方當做常數來使用。例如可把在 Cart 的 Model 裡加上這行:
# 檔案 app/models/cart.rb
class Cart
  SessionKey = :cart9487

  attr_reader :items

  def initialize(items = [])
    @items = items
  end
  # ...[略]...
end
之後要取用的時候只要寫成 session[Cart::SessionKey] 即可,若之後有要改 key 的值,也只要改這個地方就行了。
本章完成的程式碼請至 GitHub 上取得 https://github.com/kaochenlong/shopping_mall ,並請切換到
using_cart_finish分支。
Comments