← 上一章:Model Migration 下一章:Model 驗證及回呼 →
Model 關連性
Model 之間的關連,主要有「一對一」、「一對多」及「多對多」這三種。用一個簡單的線上商店系統說明這些關連性:
- 一對一:每位使用者(User)可以開一家店(Store)。
- 一對多:每家店(Store)可以賣很多種的商品(Product)。
- 多對多:每家店(Store)除了可以賣很多種商品之外,每種商品也可以在很多家商店販售。
在繼續往下之前要說明一下,有些人可能會認為所謂的關連性,就是在每個資料表做一些什麼設定,就可以讓這幾個資料表彼此產生連結。事實上,在 Rails 裡所謂的關係,是指在 Model 層級的關係,主要是透過 Model 所提供的一些方法(例如 has_one、has_many 或 belongs_to)搭配 Rails 的資料表慣例設定主鍵(Primary Key)及外部鍵(Foreign Key),讓這些資料表串在一起。
關連:一對一
我們從最簡單的一對一關連開始:每位使用者(User)可以開一家店(Store)。
第 0 步:建立 Model
Model 名稱: User
| 欄位名稱 | 型態 | 說明 |
|---|---|---|
| name | 字串(String) | 姓名 |
| 字串(String) | ||
| tel | 字串(String) | 電話 |
Model 名稱:Store
| 欄位名稱 | 型態 | 說明 |
|---|---|---|
| title | 字串(String) | 商店名稱 |
| tel | 字串(String) | 聯絡電話 |
| address | 字串(String) | 商店地址 |
| user_id | 數字(Integer) | 使用者編號 |
我們使用 Rails 的 Model 產生器來產生 User Model:
$ bin/rails g model User name email tel
  invoke  active_record
  create    db/migrate/20170102113327_create_users.rb
  create    app/models/user.rb
  invoke    test_unit
  create      test/models/user_test.rb
  create      test/fixtures/users.yml
再來是建立 Store Model:
$ bin/rails g model Store title tel address user_id:integer
  invoke  active_record
  create    db/migrate/20170102113358_create_stores.rb
  create    app/models/store.rb
  invoke    test_unit
  create      test/models/store_test.rb
  create      test/fixtures/stores.yml
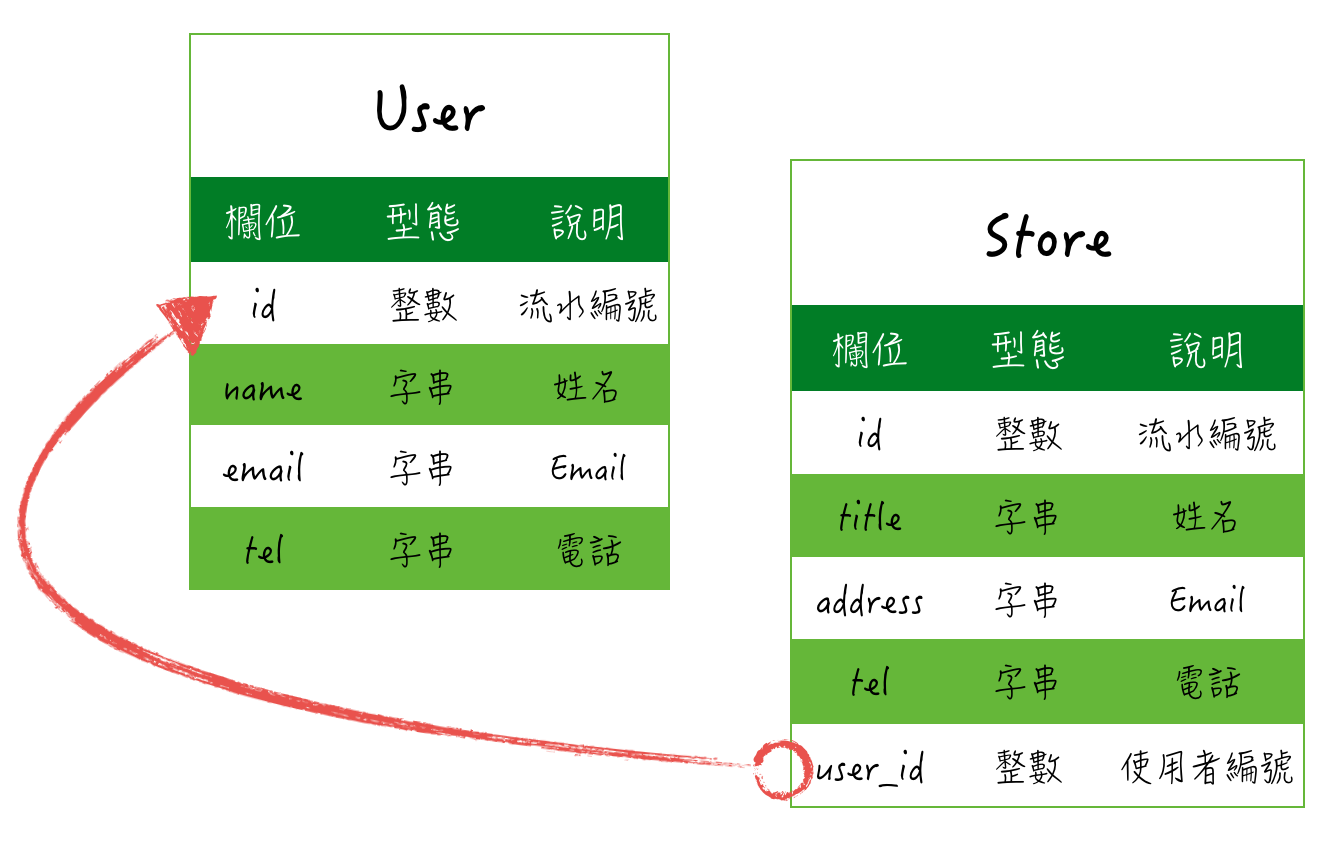
這兩個 Model 大部份都沒什麼新東西,只有在 Store 裡有一個比較特別的 user_id 欄位:
user_id這個欄位的型態是數字,主要的用途是用來對應到UserModel 的id欄位,又稱它叫外部鍵(Foreign Key)。- 這個欄位要叫什麼名字都可以,但在 Rails 裡的慣例,是「要被對到的那個 Model 的名字」加上
_id。 - 並不是加上這個之後就會有關連!
注意:別忘了執行
bin/rails db:migrate
第 1 步:在 Model 設定關連
編輯 User 跟 Store 這兩個 Model 的內容,分別加上 has_one 與 belongs_to:
# 檔案:app/models/user.rb
class User < ApplicationRecord
  has_one :store
end
# 檔案:app/models/store.rb
class Store < ApplicationRecord
  belongs_to :user
end
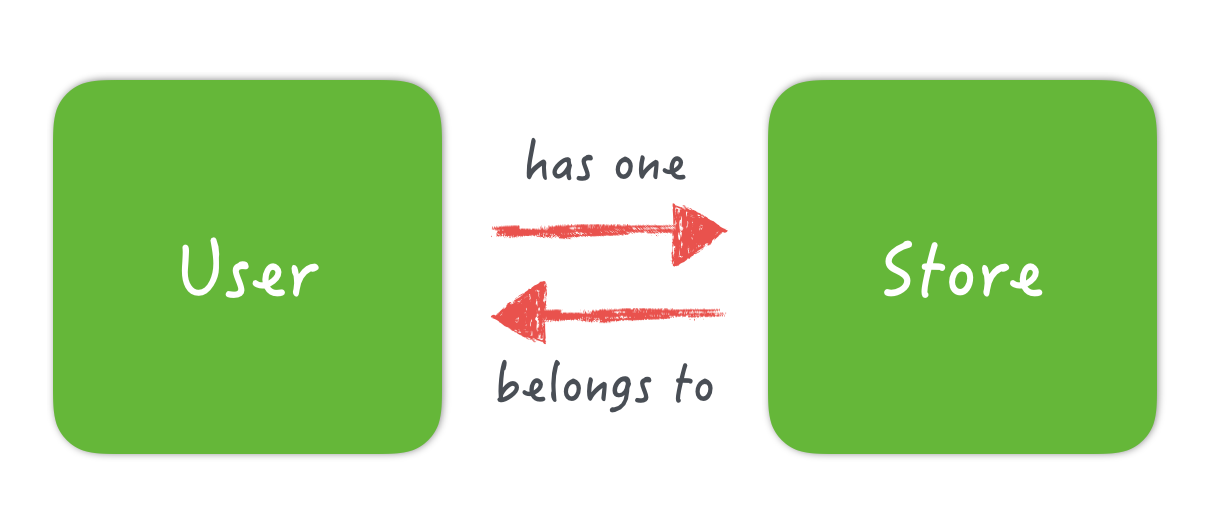
這樣一來就算是把這兩個 Model 的關連建立起來了,現在這兩個 Model 的關係是:
但其實這 has_one 跟 belongs_to 方法也沒這麼神奇,當你加上 has_one :store 之後,User Model 會自動多了幾個好用的方法:
1. 多了 store 跟 store= 方法可以取用及設定 Store:
讓我們到 rails console 環境試玩一下:
先用 new 方法建立一個使用者:
>> user1 = User.new(name: "孫悟空")
=> #<User id: nil, name: "孫悟空", email: nil, tel: nil, created_at: nil, updated_at: nil>
再用 new 方法建立一間商店:
>> store1 = Store.new(title:"太空膠囊公司")
=> #<Store id: nil, title: "太空膠囊公司", tel: nil, address: nil, user_id: nil, created_at: nil, updated_at: nil>
然後把 store1 指定給 user1:
>> user1.store = store1
=> #<Store id: nil, title: "太空膠囊公司", tel: nil, address: nil, user_id: nil, created_at: nil, updated_at: nil>
呼叫 save 方法:
>> user1.save
   (0.1ms)  begin transaction
  SQL (0.4ms)  INSERT INTO "users" ("name", "created_at", "updated_at") VALUES (?, ?, ?)  [["name", "孫悟空"], ["created_at", 2017-01-02 13:50:16 UTC], ["updated_at", 2017-01-02 13:50:16 UTC]]
  SQL (0.1ms)  INSERT INTO "stores" ("title", "user_id", "created_at", "updated_at") VALUES (?, ?, ?, ?)  [["title", "太空膠囊公司"], ["user_id", 3], ["created_at", 2017-01-02 13:50:16 UTC], ["updated_at", 2017-01-02 13:50:16 UTC]]
   (0.8ms)  commit transaction
=> true
這時候兩筆資料都會存到各別的資料表裡,並從會把 store1 的 user_id 欄位設定成 user1 的 id。
2. 多了 build_store 與 create_store 方法可以用來建立 Store 資料:
除了分別先建立 user1 跟 store1 這兩個物件再設定關連外,也可以用「從 User 的角度直接來建立商店」。同樣先使用 new 方法建立一個 User 物件:
>> user2 = User.new(name: "貝吉塔")
=> #<User id: nil, name: "貝吉塔", email: nil, tel: nil, created_at: nil, updated_at: nil>
接著可直接使用 build_store 方法,建立一個 Store 物件:
>> user2.build_store(title: "貝吉塔行星")
=> #<Store id: nil, title: "貝吉塔行星", tel: nil, address: nil, user_id: nil, created_at: nil, updated_at: nil>
最後呼叫 save 方法,把這兩筆資料存入資料表:
>> user2.save
   (0.1ms)  begin transaction
  SQL (1.0ms)  INSERT INTO "users" ("name", "created_at", "updated_at") VALUES (?, ?, ?)  [["name", "貝吉塔"], ["created_at", 2017-01-02 14:08:47 UTC], ["updated_at", 2017-01-02 14:08:47 UTC]]
  SQL (0.1ms)  INSERT INTO "stores" ("title", "user_id", "created_at", "updated_at") VALUES (?, ?, ?, ?)  [["title", "貝吉塔行星"], ["user_id", 5], ["created_at", 2017-01-02 14:08:47 UTC], ["updated_at", 2017-01-02 14:08:47 UTC]]
   (0.8ms)  commit transaction
=> true
一樣可以看到 user_id 的資料被設定成 user_2 的 id。另外,如果中間的 build_store 換成 create_store,則不需要呼叫 save 就會直接存入資料表。這原理跟 Model 的 new 跟 create 是差不多的概念。
3. 加了 belongs_to 之後…
反過來,當你在 has_one 的另一側,也就是 Store Model 裡加上 belongs_to 方法後,Store Model 也會多出了 user 跟 user= 等方法可以讓你從 Store 直接存取 User 的資料:
>> store1 = Store.first
  Store Load (0.1ms)  SELECT  "stores".* FROM "stores" ORDER BY "stores"."id" ASC LIMIT ?  [["LIMIT", 1]]
=> #<Store id: 1, title: "太空膠囊公司", tel: nil, address: nil, user_id: 2, created_at: "2017-01-02 13:49:11", updated_at: "2017-01-02 13:49:11">
因為有設定了 belongs_to :user,所以可以直接用 user 方法來取用這筆資料對應到的 User 物件:
>> store1.user
  User Load (0.1ms)  SELECT  "users".* FROM "users" WHERE "users"."id" = ? LIMIT ?  [["id", 2], ["LIMIT", 1]]
=> #<User id: 2, name: "孫悟空", email: nil, tel: nil, created_at: "2017-01-02 13:49:11", updated_at: "2017-01-02 13:49:11">
仔細看一下上面這段翻譯出來的 SQL 語法,當你執行了 store1.user 方法,事實上 Model 是去幫你查「請問,在 users 這個表格裡,有沒有人的 id 跟我這個 store1 的 user_id 的值是一樣的呢」,相當方便吧。
4. 斷頭資料預設沒辦法寫入
在我們上面這個範例來說,比較早期的 Rails 版本,在沒有 User 的情況下直接建立 Store 資料是可以的,但在 Rails 5 之後這樣做會發生錯誤:
>> store2 = Store.create(title: "紅緞帶公司")
   (0.1ms)  begin transaction
   (0.1ms)  rollback transaction
=> #<Store id: nil, title: "紅緞帶公司", tel: nil, address: nil, user_id: nil, created_at: nil, updated_at: nil>
無法寫入 Store 資料表,看一下問題是什麼:
>> store2.errors
=> #<ActiveModel::Errors:0x007f9b84a9e030 @base=#<Store id: nil, title: "紅緞帶公司", tel: nil, address: nil, user_id: nil, created_at: nil, updated_at: nil>, @messages={:user=>["must exist"]}, @details={:user=>[{:error=>:blank}]}>
>> store2.errors.full_messages
=> ["User must exist"]
仔細看一下裡面的錯誤訊息是「User must exist」,也就是必須要有「頭」才行,這是 Rails 5 之後對 belongs_to 加入的新限制。但如果覺得這樣有點麻煩想要關掉,可在 belongs_to 後面加上 optional: true 的參數:
class Store < ApplicationRecord
  belongs_to :user, optional: true
end
常見問題
1. 前面提到 has_one 跟 belongs_to 那些動態生成的方法的名字是固定的嗎?
不算是,這個跟你 has_one 以及 belongs_to 後面接的參數有關,例如是這樣寫:
class User < ActiveRecord::Base
  has_one :profile
end
這樣你就會有:
- profile
- profile=
- build_profile
- create_profile
等方法可以用。同理,belongs_to :member 的話,就會有:
- member
- member=
等方法可使用。
2. has_one 跟 belongs_to 方法需要同時設定嗎?
不一定,端看實際需求而定。以我們上面 User 跟 Store 的例子來看,如果不需要「從 Store 反查 User」的功能,那 belongs_to 就不需要設定了。
3. 如果只設定 has_one 但沒有設定 belongs_to 的話會怎樣?
因為 belongs_to 會動態的幫你做出幾個方法,若以上面這個例子來說,沒有設定 belongs_to:
>> store1 = Store.first
  Store Load (0.2ms)  SELECT  "stores".* FROM "stores" ORDER BY "stores"."id" ASC LIMIT ?  [["LIMIT", 1]]
=> #<Store id: 1, title: "太空膠囊公司", tel: nil, address: nil, user_id: 2, created_at: "2017-01-02 13:49:11", updated_at: "2017-01-02 13:49:11">

>> store1.user
NoMethodError: undefined method `user' for #<Store:0x007fc2b2fbaf00>
Did you mean?  user_id
  from /Users/user/.rvm/gems/ruby-2.4.0/gems/activemodel-5.0.1/lib/active_model/attribute_methods.rb:433:in `method_missing'
  from (irb):2
  from /Users/user/.rvm/gems/ruby-2.4.0/gems/railties-5.0.1/lib/rails/commands/console.rb:65:in `start'
  from /Users/user/.rvm/gems/ruby-2.4.0/gems/railties-5.0.1/lib/rails/commands/console_helper.rb:9:in `start'
  ...[略]...
就會出現找不到 user 這個方法的錯誤訊息。
關連:一對多
如果我們希望每間商店可以販售許多種商品,可以使用一對多模式來進行關連。先建立 Product 這個 Model:
Model 名稱:Product
| 欄位名稱 | 型態 | 說明 |
|---|---|---|
| name | 字串(String) | 商品名稱 |
| description | 文字(text) | 商品簡介 |
| price | 數字(Decimal) | 商品售價 |
| is_available | 布林(Boolean) | 是否已上架 |
| store_id | 整數(Integer) | 商店編號 |
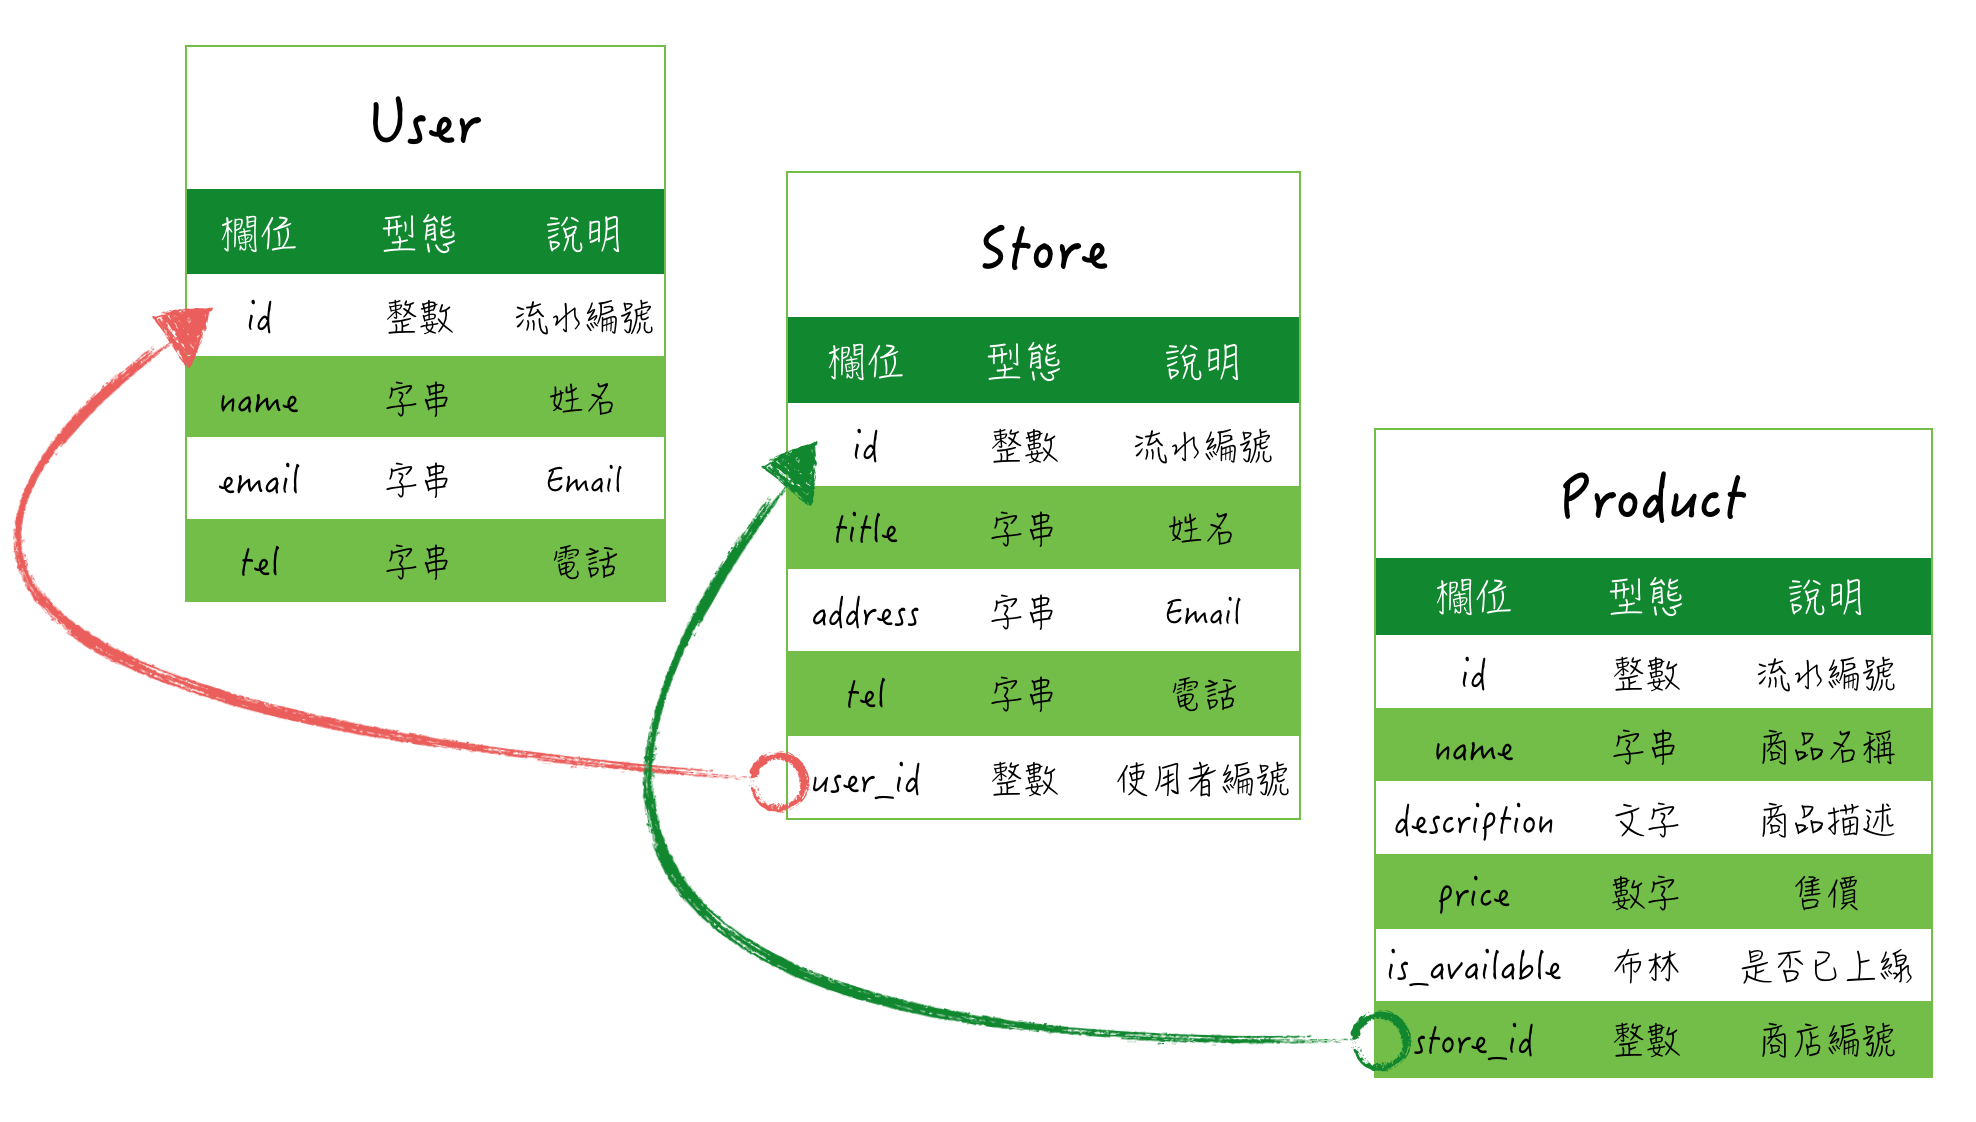
因為要讓 Product 可以對應到 Store,所以跟 Store 一樣,有個 store_id。另外商品售價建議不要用整數型態而改用數字型態(Decimal),因為不是每個國家的貨幣都是整數。(其實台灣也是有 0.5 元,也就是五角,但平常很少用)。
使用 Model 產生器產生相對應的檔案:
$ bin/rails g model Product name description:text price:decimal is_available:boolean store_id:integer
  invoke  active_record
  create    db/migrate/20170102144920_create_products.rb
  create    app/models/product.rb
  invoke    test_unit
  create      test/models/product_test.rb
  create      test/fixtures/products.yml
注意:別忘了執行
bin/rails db:migrate
現在的資料表大概長得像這樣:
Model 及資料表都建立完成了,在 Store Model 加上 has_many 設定「一對多」關連:
# 檔案:app/models/store.rb
class Store < ApplicationRecord
  belongs_to :user
  has_many :products
end
另一側的 Product Model 也加一下 belongs_to:
# 檔案:app/models/product.rb
class Product < ApplicationRecord
  belongs_to :store
end
現在 Model 之間的關連大概是這樣:

跟一對一的 has_one 一樣,設定 has_many :products 後會多了以下幾個方法:
- products
- products=
- build
- create
讓我們進 rails console 看一下用起來的樣子,先隨便找一間商店出來:
>> store1 = Store.first
  Store Load (0.2ms)  SELECT  "stores".* FROM "stores" ORDER BY "stores"."id" ASC LIMIT ?  [["LIMIT", 1]]
=> #<Store id: 1, title: "太空膠囊公司", ...[略]... updated_at: "2017-01-02 13:49:11">
再建立兩筆資料,分別是 product1 跟 product2:
>> product1 = Product.new(name: "100 倍重力訓練機", price: 10000)
=> #<Product id: nil, name: "100 倍重力訓練機", description: ...[略]..., updated_at: nil>
>> product2 = Product.new(name: "膠囊機車", price: 2000)
=> #<Product id: nil, name: "膠囊機車", description: ...[略]..., updated_at: nil>
然後把 product1 跟 product2 丟給 store1:
>> store1.products = [product1, product2]
  Product Load (0.2ms)  SELECT "products".* FROM "products" WHERE "products"."store_id" = ?  [["store_id", 1]]
   (0.0ms)  begin transaction
  SQL (0.3ms)  INSERT INTO "products" ("name", "price", "store_id", "created_at", "updated_at") VALUES (?, ?, ?, ?, ?)  [["name", "100 倍重力訓練機"], ["price", #<BigDecimal:7fcca3381658,'0.1E5',9(27)>], ["store_id", 1], ["created_at", 2017-01-02 15:05:00 UTC], ["updated_at", 2017-01-02 15:05:00 UTC]]
  SQL (0.1ms)  INSERT INTO "products" ("name", "price", "store_id", "created_at", "updated_at") VALUES (?, ?, ?, ?, ?)  [["name", "膠囊機車"], ["price", #<BigDecimal:7fcca3361218,'0.2E4',9(27)>], ["store_id", 1], ["created_at", 2017-01-02 15:05:00 UTC], ["updated_at", 2017-01-02 15:05:00 UTC]]
   (0.8ms)  commit transaction
=> [#<Product id: 1, name: "100 倍重力訓練機", description: ...[略]... updated_at: "2017-01-02 15:05:00">, #<Product id: 2, name: "膠囊機車", description: ...[略]... updated_at: "2017-01-02 15:05:00">]
這樣就完成了。如果你想只丟單筆資料給 store1 的話也可以這樣做:
>> store1.products << product3
確認一下資料是不是真的有寫進去:
>> store1.products
=> #<ActiveRecord::Associations::CollectionProxy [#<Product id: 1, name: "100 倍重力訓練機", description: ...[略]..., updated_at: "2017-01-02 15:05:00">, #<Product id: 2, name: "膠囊機車", description: ...[略]... updated_at: "2017-01-02 15:05:00">]>
確認資料筆數:
>> store1.products.count
   (0.2ms)  SELECT COUNT(*) FROM "products" WHERE "products"."store_id" = ?  [["store_id", 1]]
=> 2
的確是 2 筆沒錯。
除了上面這種用法外,跟 has_one 一樣,也可從 Store 的角度建立商品:
>> store1.products.build(name: "賽亞超人變身手錶", price: 10)
=> #<Product id: nil, name: "賽亞超人變身手錶", ...[略]... updated_at: nil>
>> store1.save
   (0.1ms)  begin transaction
  User Load (0.1ms)  SELECT  "users".* FROM "users" WHERE "users"."id" = ? LIMIT ?  [["id", 2], ["LIMIT", 1]]
  SQL (0.3ms)  INSERT INTO "products" ("name", "price", "store_id", "created_at", "updated_at") VALUES (?, ?, ?, ?, ?)  [["name", "賽亞超人變身手錶"], ["price", #<BigDecimal:7fcca2a67630,'0.1E2',9(27)>], ["store_id", 1], ["created_at", 2017-01-02 15:13:23 UTC], ["updated_at", 2017-01-02 15:13:23 UTC]]
   (4.1ms)  commit transaction
=> true
如果把 build 改用 create 則不需另外呼叫 save 方法,直接寫入資料表。
常見問題
has_many 後面一定要接複數嗎? 設定單數會怎樣?
不會怎樣,只是有點違反 Rails 的慣例,例如我把原來的 has_many :products 改成 has_many :product:
>> store1 = Store.first
  Store Load (0.1ms)  SELECT  "stores".* FROM "stores" ORDER BY "stores"."id" ASC LIMIT ?  [["LIMIT", 1]]
=> #<Store id: 1, title: "太空膠囊公司", ...[略]..., updated_at: "2017-01-02 13:49:11">
然後就發現原來的 products 方法不能用了(因為沒設定了當然不能用):
>> store1.products
NoMethodError: undefined method `products' for #<Store:0x007fbb1a628e28>
Did you mean?  product
               product=
  from /Users/user/.rvm/gems/ruby-2.4.0/gems/activemodel-5.0.1/lib/active_model/attribute_methods.rb:433:in `method_missing'
  from (irb):2
  from /Users/user/.rvm/gems/ruby-2.4.0/gems/railties-5.0.1/lib/rails/commands/console.rb:65:in `start'
  ...[略]...
  from /Users/user/.rvm/gems/ruby-2.4.0/gems/railties-5.0.1/lib/rails/commands.rb:18:in `<top (required)>'
  from bin/rails:4:in `require'
  from bin/rails:4:in `<main>'
因為我們是設定單數的方法,所以反而是單數的方法可正常運作:
>> store1.product
  Product Load (0.2ms)  SELECT "products".* FROM "products" WHERE "products"."store_id" = ?  [["store_id", 1]]
=> #<ActiveRecord::Associations::CollectionProxy [#<Product id: 1, name: "100 倍重力訓練機", ..[略]..ted_at: "2017-01-02 15:13:23">]>
關連:多對多
我年輕時候曾在牙醫診所工作過一陣子,就以牙醫診所例子來說,一家診所可能有很多位醫生,每位病人來看病的時候可以選擇不同的醫生看診,以資料表關連來說,就是「醫生 has_many 病人,病人也 has_many 醫生」。其實醫生或病人本身沒辦法直接知道今天的行程(幾點的時候要看哪位病人),所以通常診所的櫃台處都會有一個類似「約診簿」的東西,記錄著這兩邊(醫生與病人)的資訊,透過約診簿就可以得知某位醫生在今天下午三點要看哪位病人。
多對多關連的概念大概就有點像這樣,沒辦法單純的在兩邊的 Model 設定 has_many 或 belongs_to 就搞定,多對多的關連通常會需要一個第三方的資料表來存放這兩邊 Model 的資訊,也就是上面例子裡「約診簿」的概念。
我們先建立一個專門存放 Store 跟 Product 這兩邊資訊的 Model:
Model 名稱:WareHouse
| 欄位名稱 | 型態 | 說明 |
|---|---|---|
| store_id | 整數(Integer) | 商店編號 |
| product_id | 整數(Integer) | 產品編號 |
如果完成,資料表大概會長這樣:
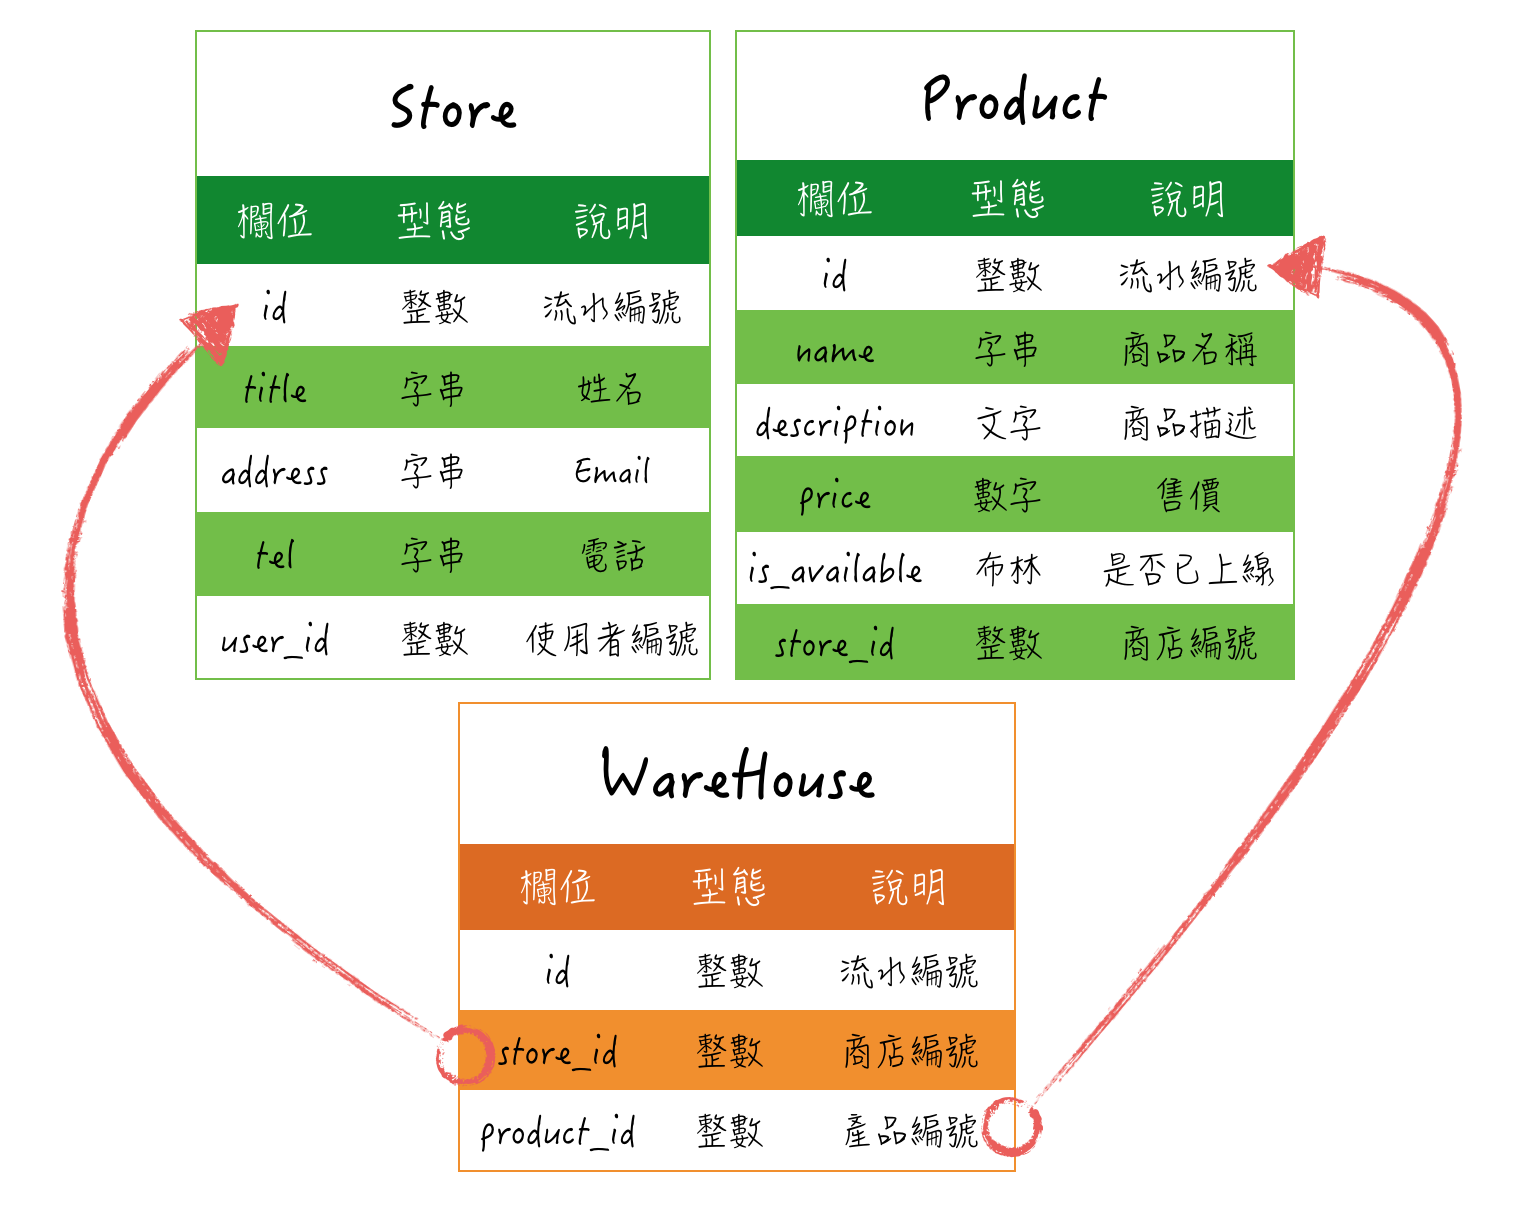
基本上這個第三方 Model (WareHouse)僅需存放兩邊 Model 的 id,如果想要增加額外的欄位也是可以。接著使用 Model 產生器產生相對應的檔案:
$ bin/rails g model WareHouse store:references product:references
  invoke  active_record
  create    db/migrate/20170102182749_create_ware_houses.rb
  create    app/models/ware_house.rb
  invoke    test_unit
  create      test/models/ware_house_test.rb
  create      test/fixtures/ware_houses.yml
這裡的 store:references 寫法其實也可以用前面的 store_id:integer 寫法,但 references 的寫法會多做幾件事:
- 自動加上索引(index),加快查詢速度。
- 自動幫 Model 加上
belongs_to
注意:別忘了執行
bin/rails db:migrate
接下來,讓我們編輯 app/models/ware_house.rb:
# 檔案 app/models/ware_house.rb
class WareHouse < ApplicationRecord
  belongs_to :store
  belongs_to :product
end
因為使用 references 的寫法,所以自動有幫你補上這兩行 belongs_to 方法,但如果沒有也沒關係,自己手動輸入即可。接著回到 Store Model,加上以下兩行:
# 檔案 app/models/store.rb
class Store < ApplicationRecord
  belongs_to :user

  has_many :ware_houses
  has_many :products, through: :ware_houses
end
然後同樣也在 Product Model 加上這兩行:
# 檔案 app/models/product.rb
class Product < ApplicationRecord
  has_many :ware_houses
  has_many :stores, through: :ware_houses
end
WareHouse Model 同時 belongs_to Store 以及 Product 這兩個 Model,然後 Store 跟 Product 這兩個 Model 也都 has_many WareHouse。
這三個 Model 之間的關連圖大概長這樣:
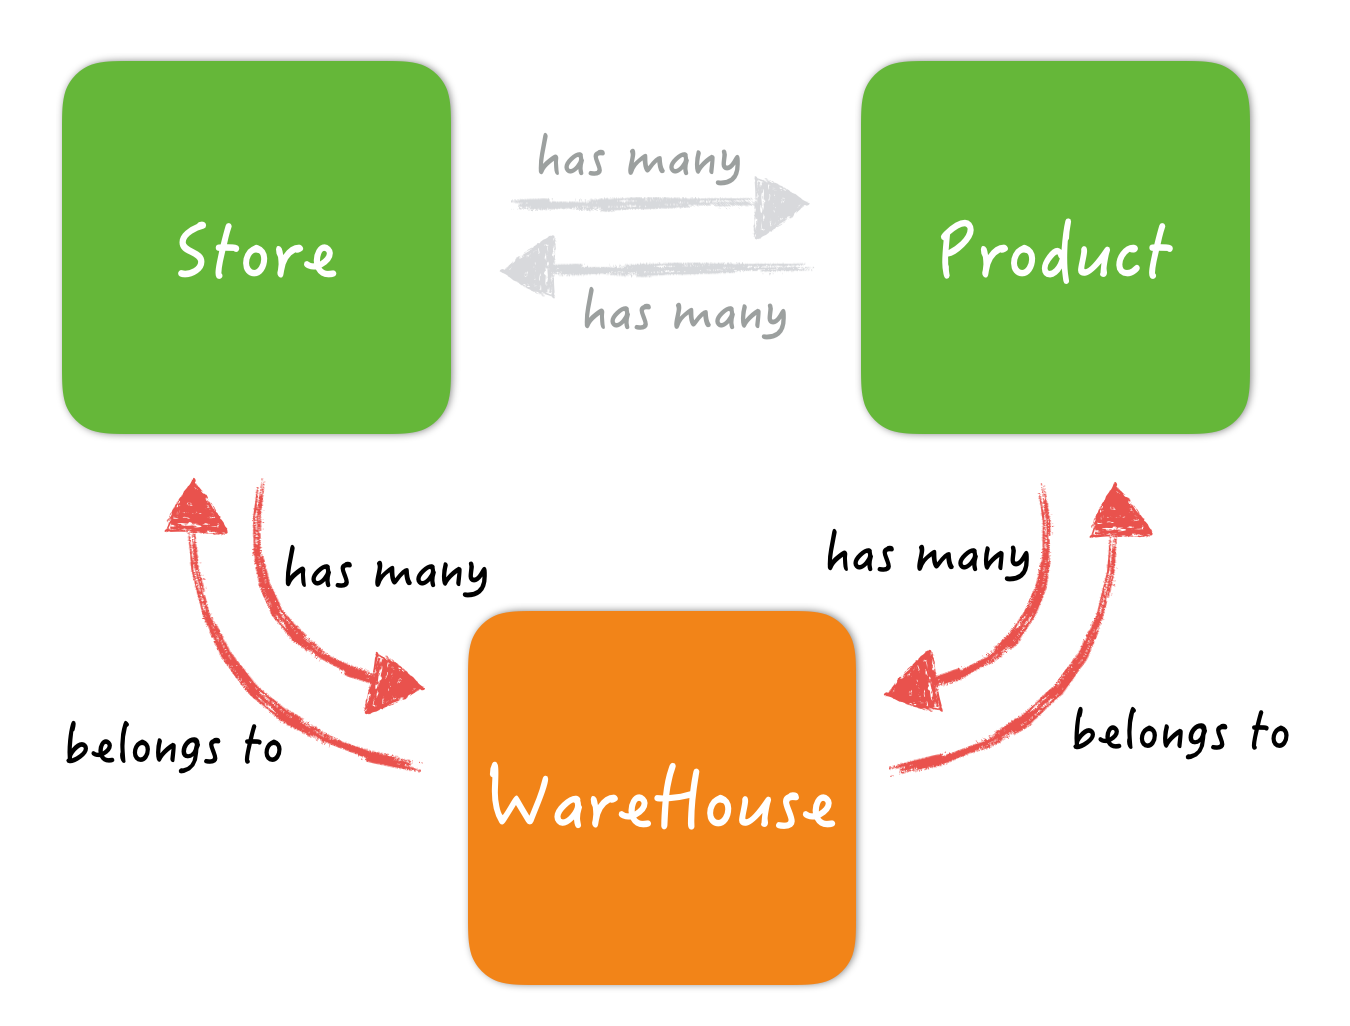
其實,Store 跟 Product 這兩個 Model 之間並沒有直接的關連,就跟前面例子裡提到醫生必須透過「約診簿」才會知道今天的行程一樣。Store 跟 Product 都是透過(through)WareHouse 的紀錄,才會知道商店與商品之間的關連。讓我們進 rails console 操作看看:
$ bin/rails console
>> store1 = Store.find(1)
  Store Load (0.2ms)  SELECT  "stores".* FROM "stores" WHERE "stores"."id" = ? LIMIT ?  [["id", 1], ["LIMIT", 1]]
=> #<Store id: 1, title: "太空膠囊公司", tel: nil, ...[略]...:11", updated_at: "2017-01-02 13:49:11">
>> store2 = Store.find(6)
  Store Load (0.1ms)  SELECT  "stores".* FROM "stores" WHERE "stores"."id" = ? LIMIT ?  [["id", 6], ["LIMIT", 1]]
=> #<Store id: 6, title: "紅緞帶公司", tel: nil, ...[略]...updated_at: "2017-01-02 14:26:48">
先取得任意兩間商店 store1 與 store2,接下來再隨便取出 3 件商品(或是要直接新增也可以):
>> product1 = Product.find(1)
  Product Load (0.1ms)  SELECT  "products".* FROM "products" WHERE "products"."id" = ? LIMIT ?  [["id", 1], ["LIMIT", 1]]
=> #<Product id: 1, name: "100 倍重力訓練機", description...[略]...updated_at: "2017-01-02 15:05:00">
>> product2 = Product.find(2)
  Product Load (0.2ms)  SELECT  "products".* FROM "products" WHERE "products"."id" = ? LIMIT ?  [["id", 2], ["LIMIT", 1]]
=> #<Product id: 2, name: "膠囊機車", description...[略]...updated_at: "2017-01-02 15:05:00">
>> product3 = Product.find(3)
  Product Load (0.1ms)  SELECT  "products".* FROM "products" WHERE "products"."id" = ? LIMIT ?  [["id", 3], ["LIMIT", 1]]
=> #<Product id: 3, name: "賽亞超人變身手錶", description...[略]...updated_at: "2017-01-02 15:13:23">
接著把 product1 跟 product2 丟給 store1,把 product2 跟 product3 丟給 store2:
>> store1.products = [product1, product2]
   (0.1ms)  begin transaction
  SQL (0.4ms)  INSERT INTO "ware_houses" ("store_id", "product_id", ...[略]...updated_at", 2017-01-02 19:35:17 UTC]]
  SQL (0.1ms)  INSERT INTO "ware_houses" ("store_id", "product_id", ...[略]...updated_at", 2017-01-02 19:35:17 UTC]]
   (0.7ms)  commit transaction

>> store2.products = [product2, product3]
   (0.1ms)  begin transaction
  SQL (0.3ms)  INSERT INTO "ware_houses" ("store_id", "product_id", ...[略]...updated_at", 2017-01-02 19:35:27 UTC]]
  SQL (0.1ms)  INSERT INTO "ware_houses" ("store_id", "product_id", ...[略]...updated_at", 2017-01-02 19:35:27 UTC]]
   (2.0ms)  commit transaction
這時候這幾個商店跟商品物件的關連圖應該長得像這樣:
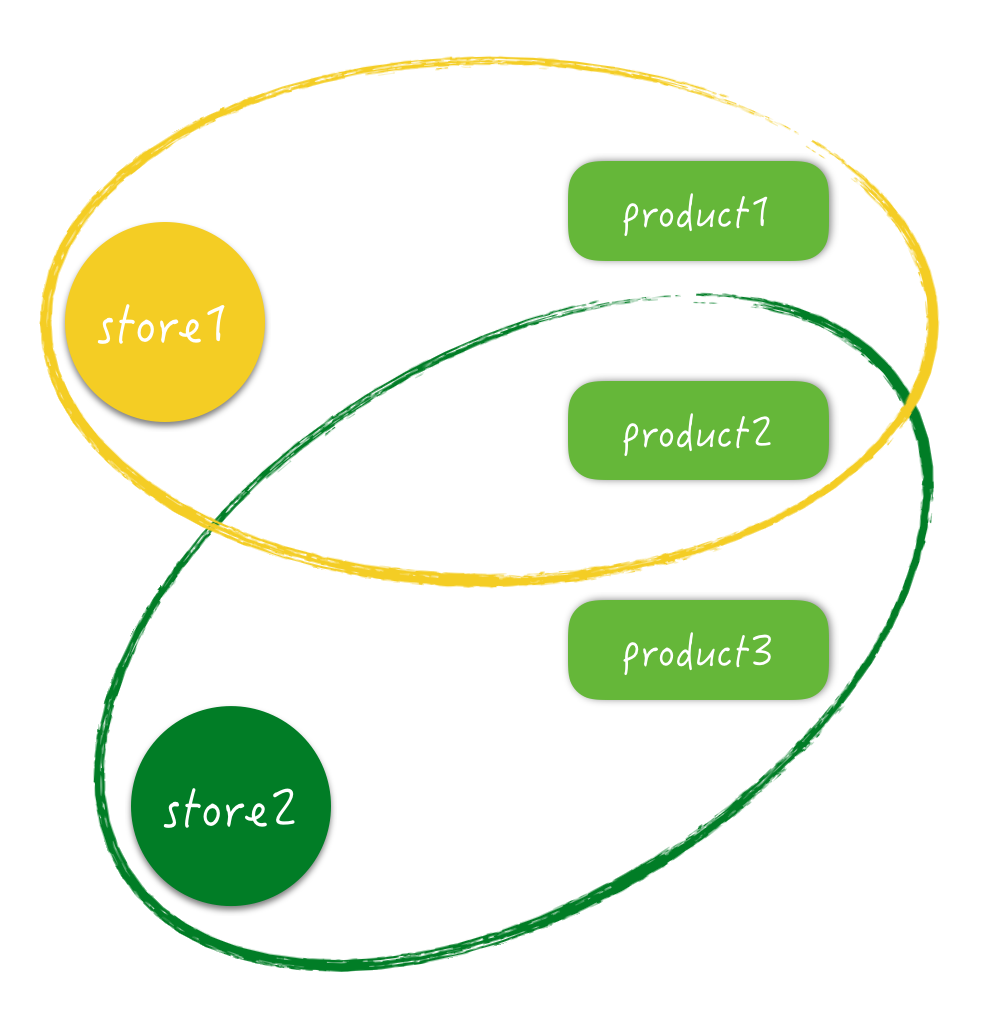
試著查詢看看,有幾家商店在賣 product1:
>> product1.stores.count
   (0.2ms)  SELECT COUNT(*) FROM "stores" INNER JOIN "ware_houses" ON "stores"."id" = "ware_houses"."store_id" WHERE "ware_houses"."product_id" = ?  [["product_id", 1]]
=> 1
如果沒寫錯的話,應該是只有 1 家沒錯,再看看 product2:
>> product2.stores.count
   (0.2ms)  SELECT COUNT(*) FROM "stores" INNER JOIN "ware_houses" ON "stores"."id" = "ware_houses"."store_id" WHERE "ware_houses"."product_id" = ?  [["product_id", 2]]
=> 2
因為在 store1 跟 store2 都有這個商品,所以是 2 家。仔細觀察,其實在這些操作的 SQL 語法中,都已經不是直接跟 Store 或 Product 要資料,而是向 WareHouse 進行查詢。
「多對多」關連,在使用上就跟一般的「一對多」差不多,但實際上的資訊都是記錄在第三方資料表裡。
HABTM(has_and_belongs_to_many)
除了 has_many ... through 的寫法,還可使用 has_and_belongs_to_many 方法來做多對多關連,而且寫法更簡單:
# Store Model
class Store < ActiveRecord::Base
  has_and_belongs_to_many :products
end

# Product Model
class Product < ActiveRecord::Base
  has_and_belongs_to_many :stores
end
就這樣,不需要另外新增第三方 Model 即可完成多對多關連。注意,我是說「不需要第三方 Model」,不是「不需要第三方資料表」,畢竟還是要有一個資料表存放雙方的資訊,只是這個資料表因為不重要也不會存取它,所以可以不需要 Model 對應。
這個第三方資料表的名字是有規定的,預設是「兩個資料表依照英文字母先後順序排序,中間以底線分格」,所以以我們這個例子來說,這個資料表的名字就是「products_stores」。(其實在使用 HABTM 的時候,可以加註 join_table: "ware_houses" 的方式來指定這個資料表的名稱)
既然不需要 Model,那我們就直接新增一個 Migration 來建立資料表:
$ bin/rails g migration create_join_table_for_store_and_product
  invoke  active_record
  create    db/migrate/20170102195954_create_join_table_for_store_and_product.rb
編輯內容如下:
class CreateJoinTableForStoreAndProduct < ActiveRecord::Migration[5.0]
  def change
    create_table :products_stores, id: false do |t|
      t.belongs_to :store, index: true
      t.belongs_to :product, index: true
    end
  end
end
注意:別忘了執行
bin/rails db:migrate
一樣到 rails console 試一下:
>> s1 = Store.first
  Store Load (0.2ms)  SELECT  "stores".* FROM "stores" ORDER BY "stores"."id" ASC LIMIT ?  [["LIMIT", 1]]
=> #<Store id: 1, title: "太空膠囊公司", tel: nil, ...[略]... updated_at: "2017-01-02 13:49:11">
>> s1.products
  Product Load (0.2ms)  SELECT "products".* FROM "products" INNER JOIN "products_stores" ON "products"."id" = "products_stores"."product_id" WHERE "products_stores"."store_id" = ?  [["store_id", 1]]
=> #<ActiveRecord::Associations::CollectionProxy []>
依舊可以正常運作,但就是往 products_stores 這個資料表存取資料了。
該選擇 has_many ... through 還是 has_and_belongs_to_many 的寫法?
基本上,如果你有需要使用這個第三方 Model 再做其它事情(例如你想知道這筆商品是在什麼時間店出貨到商店裡),選用 has_many ... through 的寫法;如果不介意也不會用到這個第三方 Model,使用 has_and_belongs_to_many 的方式也是可以的。
我個人是比較偏好 has_many ... through 的寫法,雖然寫起來比較囉嗦,但會比較清楚一點。
Comments