網站部署(使用 Heroku)
網站好不容易做好了,總不能老是在 localhost 孤芳自賞,該是把作品上傳到網路伺服器給大家欣賞一下了。
在目前眾多款式的雲端伺服器當中,Heroku 可能可以說是對 Ruby/Rails 專案最友善、部署最簡單的選擇。(畢竟 Ruby 的老爸松本行弘以及 Ruby 的前幾名重要的核心開發人員都在 Heroku 工作)
這個章節將介紹如何把 Rails 專案推上 Heroku。
申請 Heroku 帳號
目前申請 Heroku 帳號是免費的,只要填寫一些簡單的基本資料即可申請。
安裝 Heroku Cli
Heroku Cli 工具程式在好幾個平台上都有,請參考Heroku 的安裝頁面說明,找到自己適合的平台安裝。安裝完成後,在終端機環境下執行 heroku login,並輸入方才申請的帳號密碼:
$ heroku login
Enter your Heroku credentials.
Email: [email protected]
Password (typing will be hidden):
Logged in as [email protected]
這樣待會在使用 git push 指令上傳檔案的時候就不需要再輸入一次了。
部署準備
不像傳統使用 FTP 的方式上傳檔案,Heroku 平台是使用 Git 進行部署,所以,首先你的專案必須要有 Git 的版本控制。如果目前沒有,可使用指令 git init 將專案目錄加入至 Git 版控。確認目前專案已有在 Git 版控後,執行 heroku create 指令:
$ heroku create
Creating app... done, ⬢ still-dawn-85623
https://still-dawn-85623.herokuapp.com/ | https://git.heroku.com/still-dawn-85623.git
如果前面沒有先執行
heroku login,這邊會再問你一次 Heroku 的帳號密碼。
這個指令會幫你做幾件事:
- 在 Heroku 上開一台伺服器(instance),如果沒有指定名稱,Heroku 會隨機幫你搭配,像這邊我的伺服器的名字就是
still-dawn-85623。如果在建立的時候是下heroku create thank-you-9527,只要這個名字沒被用掉,它就可以幫你建立一台thank-you-9527的機器。 -
會幫 Git 加上一個名為
heroku的遠端節點:$ git remote -v heroku https://git.heroku.com/still-dawn-85623.git (fetch) heroku https://git.heroku.com/still-dawn-85623.git (push)
推向 Heroku
接下來就要開始上傳專案了。請使用 git push 指令把專案推上 Heroku:
$ git push heroku master
Counting objects: 107, done.
Delta compression using up to 8 threads.
Compressing objects: 100% (93/93), done.
Writing objects: 100% (107/107), 24.27 KiB | 0 bytes/s, done.
Total 107 (delta 2), reused 0 (delta 0)
remote: Compressing source files... done.
remote: Building source:
remote:
remote: -----> Ruby app detected
remote: -----> Compiling Ruby/Rails
remote: -----> Using Ruby version: ruby-2.2.6
remote: -----> Installing dependencies using bundler 1.13.6
remote:        Running: bundle install --without development:test --path vendor/bundle --binstubs vendor/bundle/bin -j4 --deployment
remote:        Fetching gem metadata from https://rubygems.org/.........
remote:        Fetching version metadata from https://rubygems.org/..
remote:        Fetching dependency metadata from https://rubygems.org/.
...[略]...
remote:        Installing activesupport 5.0.1
remote:        Gem::Ext::BuildError: ERROR: Failed to build gem native extension.
remote:        /tmp/build_544456257887ee3037737e3819958f76/vendor/ruby-2.2.6/bin/ruby -r
...[略]...
remote:        Make sure that `gem install sqlite3 -v '1.3.13'` succeeds before bundling.
remote:  !
remote:  !     Failed to install gems via Bundler.
remote:  !     Detected sqlite3 gem which is not supported on Heroku:
remote:  !     https://devcenter.heroku.com/articles/sqlite3
remote:  !
remote:  !     Push rejected, failed to compile Ruby app.
remote:
remote:  !     Push failed
remote: Verifying deploy...
remote:
remote: !	Push rejected to still-dawn-85623.
remote:
To https://git.heroku.com/still-dawn-85623.git
 ! [remote rejected] master -> master (pre-receive hook declined)
error: failed to push some refs to 'https://git.heroku.com/still-dawn-85623.git'
當執行 git push heroku master 指令後,可以看到當專案被推到 Heroku 之後,便開始自動進行 bundle install 指令開始安裝相關套件。但如果仔細看,會發現這段訊息:
remote:  !     Failed to install gems via Bundler.
remote:  !     Detected sqlite3 gem which is not supported on Heroku:
remote:  !     https://devcenter.heroku.com/articles/sqlite3
remote:  !
remote:  !     Push rejected, failed to compile Ruby app.
remote:
remote:  !     Push failed
發生錯誤所以被拒絕了。原因是因為 Heroku 不支援 SQLite 資料庫,所以如果你的專案是使用 SQLite,直接推上去就會看到這個錯誤訊息。
使用 PostgreSQL 資料庫
Heroku 預設支援 PostgreSQL 資料庫,所以請在 Gemfile 裡做一下修改:
source 'https://rubygems.org'

git_source(:github) do |repo_name|
  repo_name = "#{repo_name}/#{repo_name}" unless repo_name.include?("/")
  "https://github.com/#{repo_name}.git"
end

gem 'rails', '~> 5.0.1'
gem 'puma', '~> 3.0'
gem 'sass-rails', '~> 5.0'
gem 'uglifier', '>= 1.3.0'
gem 'coffee-rails', '~> 4.2'
gem 'jquery-rails'
gem 'turbolinks', '~> 5'
gem 'jbuilder', '~> 2.5'

group :development, :test do
  gem 'byebug', platform: :mri
  gem 'sqlite3'
end

group :production do
  gem 'pg'
end

group :development do
  gem 'web-console', '>= 3.3.0'
  gem 'listen', '~> 3.0.5'
  gem 'spring'
  gem 'spring-watcher-listen', '~> 2.0.0'
end

# Windows does not include zoneinfo files, so bundle the tzinfo-data gem
gem 'tzinfo-data', platforms: [:mingw, :mswin, :x64_mingw, :jruby]
說明:
- Heroku 預設是 production 模式,所以我把
sqlite3移到:development或:test的那個群組裡。但如果你原本在本機開發模式就沒打算使用 SQLite,也可把sqlite3這個套件整個移除。 - 我加了一個
:production的群組,並把pg這個套件加進去,pg就是 PostgreSQL 資料庫會用到的套件。
修改完 Gemfile 後,別忘了執行 bundle install 確保每個套件都有正確安裝。
如果你在 bundle install 的過程發生失敗,很有可能是你目前的環境還沒有安裝 PostgreSQL 資料庫,所以在 bundle install 的過程會發生錯誤。解決方法有兩種:
- 就是把 PostgreSQL 資料庫安裝起來吧!(詳情請洽 PostgreSQL 官網)
- 如果你還不想安裝這個資料庫,也可改執行
bundle install --without production指令,暫時「跳過」安裝 production 這個群組裡面的套件。
把 SQLite 換成 PG 之後,接下來準備來推第二次吧!
注意:做完
bundle install之後別忘了要把剛剛做的這些變更再 commit 一次到 Git 版控,不然你再推一次也只是會把前一次 commit 的內容推上去而已,還是會發生一樣的錯誤。
重新部署
$ git push heroku master
Counting objects: 111, done.
Delta compression using up to 8 threads.
Compressing objects: 100% (97/97), done.
Writing objects: 100% (111/111), 24.69 KiB | 0 bytes/s, done.
Total 111 (delta 5), reused 0 (delta 0)
remote: Compressing source files... done.
remote: Building source:
remote:
remote: -----> Ruby app detected
remote: -----> Compiling Ruby/Rails
remote: -----> Using Ruby version: ruby-2.2.6
remote: -----> Installing dependencies using bundler 1.13.6
remote:        Running: bundle install --without development:test --path vendor/bundle --binstubs vendor/bundle/bin -j4 --deployment
remote:        Fetching gem metadata from https://rubygems.org/.........
remote:        Installing i18n 0.7.0
...[略]...
remote: -----> Detecting rake tasks
remote: -----> Preparing app for Rails asset pipeline
remote:        Running: rake assets:precompile
remote:        Running: rake assets:clean
remote:
remote: -----> Compressing...
remote:        Done: 28M
remote: -----> Launching...
remote:        Released v5
remote:        https://still-dawn-85623.herokuapp.com/ deployed to Heroku
remote:
remote: Verifying deploy.... done.
To https://git.heroku.com/still-dawn-85623.git
 * [new branch]      master -> master
看到 Verifying deploy.... done. 字樣,應該就可以放心了。
如果這是你第一次部署的話,你還會需要執行 rails db:migrate 指令,確保所有的 Migration 都有被執行到。但… 如果只是單純的執行 rails db:migrate,那只會在我們的本機環境執行而已,所以在指令前面需要加上 heroku run,請 Heroku 幫我們執行這個指令:
$ heroku run rails db:migrate
Running rails db:migrate on ⬢ still-dawn-85623... up, run.2491 (Free)
D, [2017-01-14T14:39:58.762047 #4] DEBUG -- :    (11.5ms)  CREATE TABLE "schema_migrations" ("version" character varying PRIMARY KEY)
D, [2017-01-14T14:39:58.777120 #4] DEBUG -- :    (9.1ms)  CREATE TABLE "ar_internal_metadata" ("key" character varying PRIMARY KEY, "value" character varying, "created_at" timestamp NOT NULL, "updated_at" timestamp NOT NULL)
D, [2017-01-14T14:39:58.779005 #4] DEBUG -- :    (0.7ms)  SELECT pg_try_advisory_lock(4113039382789904700);
D, [2017-01-14T14:39:58.787621 #4] DEBUG -- :   ActiveRecord::SchemaMigration Load (0.9ms)  SELECT "schema_migrations".* FROM "schema_migrations"
I, [2017-01-14T14:39:58.793414 #4]  INFO -- : Migrating to CreateBooks (20170114133122)
D, [2017-01-14T14:39:58.795616 #4] DEBUG -- :    (0.8ms)  BEGIN
== 20170114133122 CreateBooks: migrating ======================================
-- create_table(:books)
D, [2017-01-14T14:39:58.805835 #4] DEBUG -- :    (9.0ms)  CREATE TABLE "books" ("id" serial primary key, "title" character varying, "description" text, "price" decimal, "created_at" timestamp NOT NULL, "updated_at" timestamp NOT NULL)
   -> 0.0101s
== 20170114133122 CreateBooks: migrated (0.0102s) =============================

D, [2017-01-14T14:39:58.819016 #4] DEBUG -- :   SQL (1.2ms)  INSERT INTO "schema_migrations" ("version") VALUES ($1) RETURNING "version"  [["version", "20170114133122"]]
D, [2017-01-14T14:39:58.822167 #4] DEBUG -- :    (2.7ms)  COMMIT
D, [2017-01-14T14:39:58.830526 #4] DEBUG -- :   ActiveRecord::InternalMetadata Load (0.9ms)  SELECT  "ar_internal_metadata".* FROM "ar_internal_metadata" WHERE "ar_internal_metadata"."key" = $1 LIMIT $2  [["key", :environment], ["LIMIT", 1]]
D, [2017-01-14T14:39:58.844083 #4] DEBUG -- :    (0.9ms)  BEGIN
D, [2017-01-14T14:39:58.846250 #4] DEBUG -- :   SQL (0.9ms)  INSERT INTO "ar_internal_metadata" ("key", "value", "created_at", "updated_at") VALUES ($1, $2, $3, $4) RETURNING "key"  [["key", "environment"], ["value", "production"], ["created_at", 2017-01-14 14:39:58 UTC], ["updated_at", 2017-01-14 14:39:58 UTC]]
D, [2017-01-14T14:39:58.847942 #4] DEBUG -- :    (1.4ms)  COMMIT
D, [2017-01-14T14:39:58.848833 #4] DEBUG -- :    (0.7ms)  SELECT pg_advisory_unlock(4113039382789904700)
heroku run 後面接的指令,表示是要在 Heroku 伺服器上執行的,這樣一來所有的 Migration 就都有被執行到了。
接著打開瀏覽器,輸入網址 https://still-dawn-85623.herokuapp.com/ 應該就可以連上專案了,其中網址前面的 still-dawn-85623 就是我們這台機器的名字。
之後如果專案有任何修改,就是照著以下流程操作:
- 把有修改的檔案透過
git add加進版控。 git commit把目前的進度存進 Git 的 Repository。git push heroku master。- 必要的時候請
heroku run幫你執行需要的指令,例如rails db:migrate。
注意:Heroku 只有當你推的是
master分支的時候才會有效果!
小結
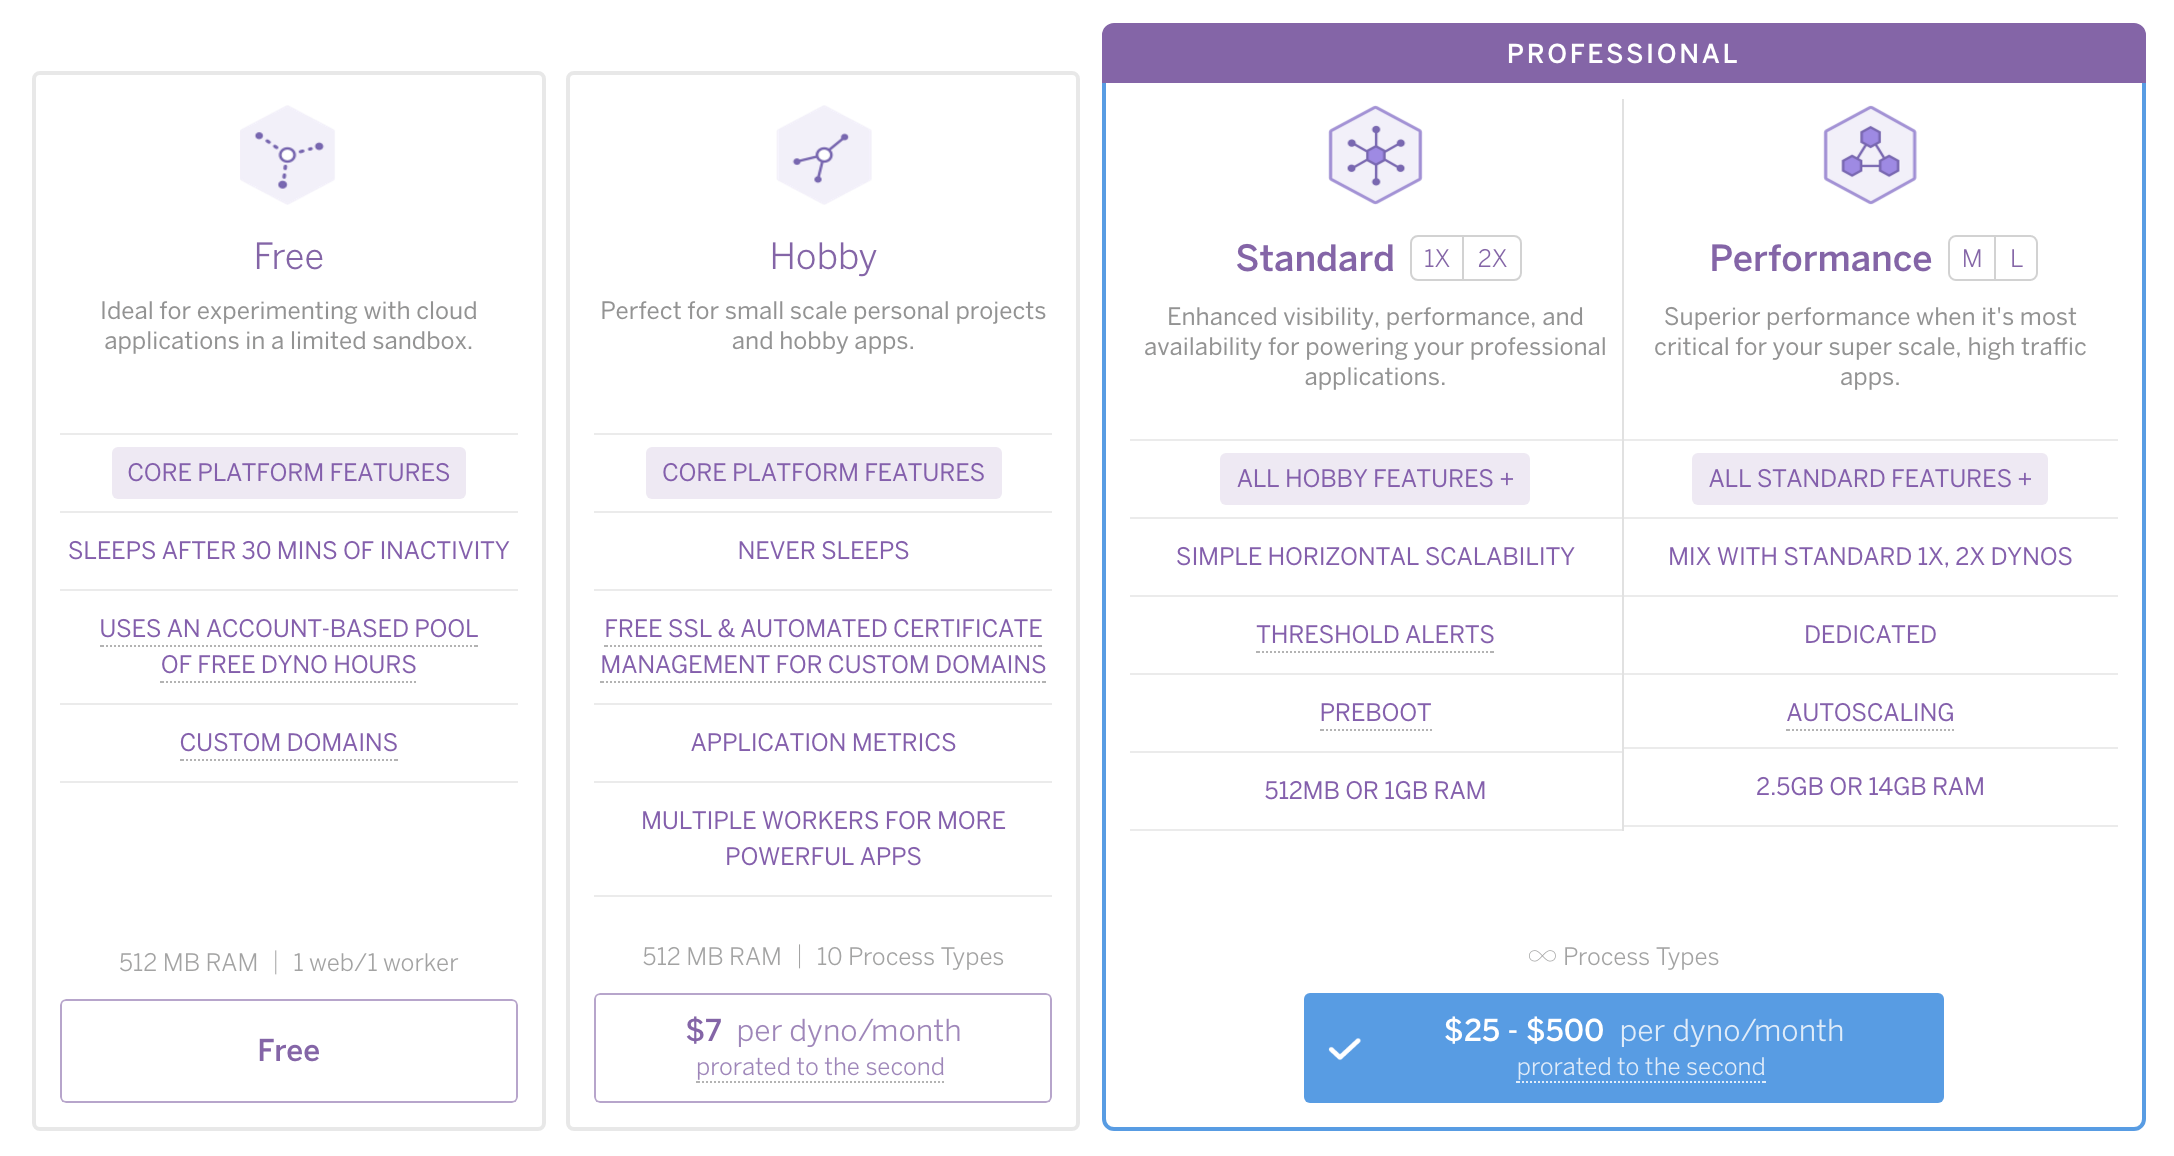
以價錢來說,雖然 Heroku 有提供免費使用額度,但因為免費的機器有「30 分鐘沒有人連線的話就會進入休眠」以及「每天至少要休眠 8 小時」的限制,如果是創業初期,可先選擇每個月 7 元方案,待使用者變多、網站流量開始變大之後可再昇級更高等級的設備。
在眾多雲端平台中,Heroku 絕對不是最便宜的(事實上它可能是最貴的),但因為不需要花太多時間在機器維護上,在創業初期人力不足的情況下,倒是個不錯的選擇。
Comments